Core-To-Core Splice
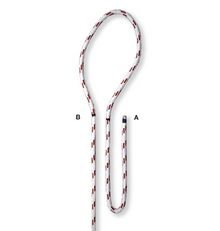
Figure 1
Step # 1: Place a single wrap of tape on the end of the rope, measure off three (3) fid lengths from the end and make a mark on the cover. This is mark “A”. Form the eye and make a second mark opposite the first. This is mark “B”. “A” to “B” = Eye Size. Tie a slipknot approximately ten (10) fid lengths down from mark “B”. (Fig. 1)
Step #2: Extract the core at mark “B” by bending rope sharply and carefully spreading the cover strands to expose the core. Then pry the core braid out using the pointed end of the fid. Place a single wrap of tape on the end of the core and then, while holding exposed core, slide the cover back as far as possible towards the knot. Then smooth the cover …
Figure 2
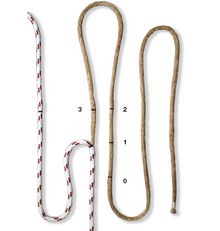
… back over the core to the point of extraction. Smooth cover again until all slack is removed and mark the core where it comes out of the cover. This is mark “0”. Again, slide the cover back towards the knot and measure one short fid section towards the knot from mark “0” and mark the core. This is mark “1”. Measure one more short fid from mark “1”, and this is mark “2”. Measure 4 fid lengths towards the knot from mark “2” and mark the core. This is Mark “3”. (Fig. 2)
Note: If using a captive thimble or shackle, insert the cover tail so that the thimble or shackle is situated between marks A & B
Figure 3
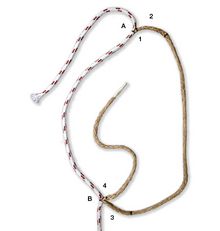
Step #3: Attach the fid to the end of the core. Insert the core into the cover at mark “A” around the radius of the eye and out of the cover at mark “B”. The two sections of the core exiting from the cover at mark “B” should pass through the same hole between the cover stands. Pull the core through the cover until mark “1” on the core is aligned with mark “A” on the cover. Hold mark “1” and mark “A” together and smooth out the cover from mark “A” to mark “B” to remove all of the slack in the cover. After removing all of the cover slack, mark the core tail where it exits the cover at mark “B”. This is mark “4”. At a distance 1/3rd of the way from mark “4” towards the end of the core make a mark on the core, this is your “core tapering mark”. (Fig. 3)
Figure 4
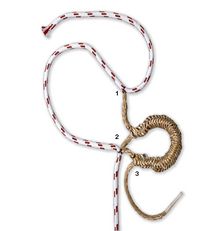
Step #4: With the fid still attached to the end of the core, insert the core tail into the core at mark “2” and out at mark “3”. Pull the core tail through until mark “4” is aligned with mark “2”. Pull out sufficient core tail from mark “3” to ex- pose the “core tapering mark” and remove the fid. (Fig. 4)
Note: You may want to rap some tape around the core where marks 2 & 4 meet to temporarily hold them together.
Step #5: At the core tapering mark, cut and remove one strand. Measure a distance equal to 1/12th the distance from the core taper mark to the end of the core (core taper increment) then cut & remove one strand. Continue using that same measurement (core taper increment) to cut and remove strands until you have cut 11 of the 12 strands to create a smooth taper. Hold the core where marks 2 & 4 coincide and smooth the core back to bury the section that was just tapered
Step#6: Before burying the cover tail, taper the end of the tail and tape tightly. Attach the cover tail to a very small fid and proceed to bury the cover tail. When burying the tail enter at Mark B and exit down the rope a distance equal to 7 times the rope diameter. Pull such that at least half of the cover tail is exiting the rope at that point.
Notes:
- Make sure not to snag any of the core fibers while burying the cover tail and take care not to twist the cover tail. Secure the slipknot to a fixed anchor point. Remove the wrap of tape from core at marks 2 and 4. Holding the core at the point where marks “2” & “4” coincides, place tension on the rope and smooth out the cover back over the core from the slipknot towards the eye.
- While smoothing the rope / cover back it will be necessary to pull on the cover tail a few times to remove any slack generated. As the cover approached the point on the core where marks “2”&”4” coincide you may have some bagging of core that is coming out of the eye at “B”. Smooth the cover from “A” to “B” to draw that bag- ging of core down into the body of the rope. As the cover approaches the point on the core where marks “2” & “4” coincide, it may be necessary to alternately pull some of the core back out of the cover. Continue smoothing the cover over the exposed core in order to get the cover marks “A” and “B” to be side by side.
- Pull the cover tail to completely bury mark “A” into the cover. Mark the exit point on the cover tail; then pull cover tail tightly and cut at mark. Taper cover tail, then smooth cover from mark “B” to exit point so the cover tail pulls back into splice.
- It may not be possible to bury the cover tail for every rope. If it is not possible then cross stitch and whip the cover tail to the outside of the rope after burying the core.
Step#7: Use nylon whipping thread, cross stitch and whip the portion of the splice where the cover tail is buried to prevent any slippage.


